Configuring Scan Disk on Windows 11 Setup
Understanding Scan Disk
Scan disk, also known as Check Disk (chkdsk), is a built-in utility in Windows that helps identify and fix file system errors, bad sectors, and disk corruption. It is an essential tool for maintaining the health and performance of your file system, especially when dealing with corrupted files, bad sectors, or disk errors.
Method 1: Running Scan Disk on Windows 11
To run scan disk on Windows 11, follow these steps:
- Press the Windows key + R to open the Run dialog box.
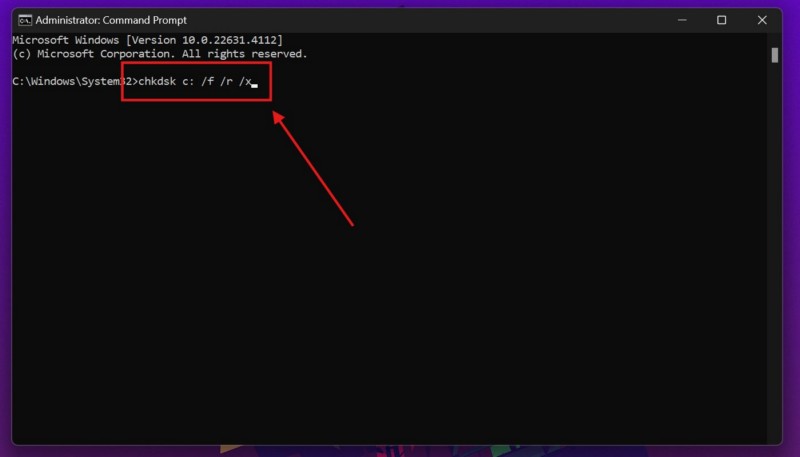
- Type "cmd" and press Enter to open the Command Prompt.
- Type "chkdsk C:" (replace "C:" with the drive letter of the disk you want to scan) and press Enter.
- Press Y to schedule the disk check at the next reboot.
- Restart your system and let the scan disk utility do its work.
The scan disk utility will check for and fix any errors, bad sectors, or disk corruption on the specified drive. You will see the results of the scan disk operation in the Command Prompt window.
Method 2: Using the Windows 11 Settings App
To run scan disk using the Windows 11 Settings app, follow these steps:
- Press the Windows key + S to open the search bar.
- Search for "Disk Management" and open the Disk Management window.
- Right-click on the disk you want to scan and select "Properties.".
- Click on the "Tools" tab and select "Check" under the "Error checking" section.
- Click "Scan" to start the scan disk operation.
The scan disk utility will check for and fix any errors, bad sectors, or disk corruption on the specified drive. You will see the results of the scan disk operation in the Disk Management window.
Troubleshooting Common Issues
If you encounter any issues while running scan disk on Windows 11, here are some common troubleshooting tips to help you resolve the problem:
Such details provide a deeper understanding and appreciation for Configuring Scan Disk On Windows 11 Setup.
- Make sure you have administrative privileges to run the Command Prompt or Disk Management window.
- Check if the disk you want to scan is properly connected and recognized by Windows 11.
- Ensure that the disk is not locked or in use by another application or process.
- Try running the scan disk utility in safe mode to isolate the issue.
- Check for any firmware or driver updates for your hardware and install the latest version.
- Run a system file checker (SFC) to scan for corrupted system files.
- Run a disk cleanup to remove temporary files and disk space.
- Use a third-party disk repair tool, such as EaseUS Disk Recovery, to fix disk corruption and errors.
In conclusion, configuring scan disk on Windows 11 setup is a crucial step to ensure the health and performance of your file system. By following the methods and troubleshooting tips outlined in this guide, you can seamlessly integrate your scanner and maintain the integrity of your disk. Remember to run scan disk regularly to prevent disk corruption and errors.
Frequently Asked Questions (FAQs)
Here are some frequently asked questions related to configuring scan disk on Windows 11 setup:
Q: What is scan disk used for?
Such details provide a deeper understanding and appreciation for Configuring Scan Disk On Windows 11 Setup.
A: Scan disk is used to identify and fix file system errors, bad sectors, and disk corruption.
Q: How do I run scan disk on Windows 11?
A: You can run scan disk using the Command Prompt or Disk Management window.
Q: How long does scan disk take to complete?
A: The time it takes to complete the scan disk operation depends on the size of the disk and the number of errors or bad sectors found.
Q: Can I run scan disk at the same time as other disk-intensive activities?
A: No, it is recommended to run scan disk during a quiet period when no other disk-intensive activities are taking place.


![How to Enable Scan to Computer on Windows 11 [7 Ways] - Configuring Scan Disk On Windows 11 Setup](https://iboysoft.com/images/en-wiki/scandisk-command/scandisk-command.png "How to Enable Scan to Computer on Windows 11 [7 Ways]")


![Picture of How to Enable Scan to Computer on Windows 11 [7 Ways]](https://www.guidingtech.com/wp-content/uploads/Select-Properties-1024x660.png "How to Enable Scan to Computer on Windows 11 [7 Ways]")

