Netgear Router Access Point Setup: Extend Your Network Coverage
The process of setting up a Netgear router as an access point involves configuring the device to extend the wireless coverage of your existing network. In this article, we will provide a comprehensive guide on how to set up a Netgear router in access point mode, covering all the necessary steps and tips to ensure a successful setup.
Understanding Netgear Router Access Point Setup
The Netgear router access point setup process is designed to allow you to extend the wireless coverage of your existing network by connecting a second router to the main network. This setup is particularly useful for larger homes or offices where a single router may not provide sufficient coverage. By setting up a Netgear router as an access point, you can create a seamless network experience, ensuring that all devices can connect to the network with ease.
Equipment Needed
- Netgear router (one with access point capability)
- Existing router or gateway
- Ethernet cable
- Power source
- Computer or device for configuration
This particular example perfectly highlights why Netgear Router Access Point Setup is so captivating.
Step 1: Connect the Netgear Router to the Existing Network
To set up a Netgear router as an access point, you will need to connect the device to the existing network using an Ethernet cable. This cable should be connected to one of the LAN ports on the main router. Ensure that the Netgear router is powered on and configured to operate in access point mode.
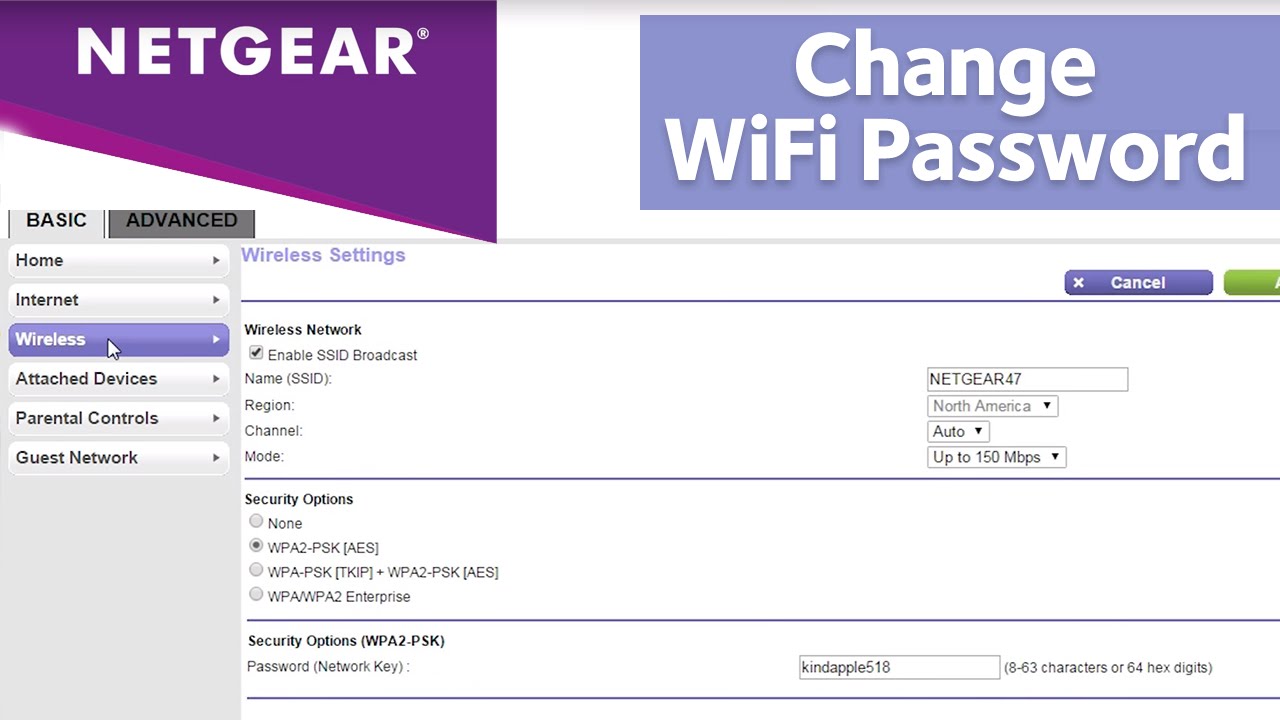
Step 2: Configure the Netgear Router as an Access Point
Once the Netgear router is connected to the existing network, you can configure it as an access point. This involves accessing the router's interface, typically by typing www.routerlogin.com into the address bar of a web browser. From there, you can navigate to the access point settings and configure the device to operate in access point mode.
Step 3: Set Up the Wireless Network

Step 4: Connect Devices to the Access Point
Conclusion
The Netgear router access point setup process is a straightforward process that can help extend the wireless coverage of your existing network. By following the steps outlined in this article, you can set up a Netgear router as an access point, ensuring a seamless network experience for all devices. Remember to ensure compatibility between the access point and existing network, and to configure the wireless settings for optimal performance.
Additional Tips and Resources
- Check the Netgear router's manual for specific instructions on how to set up the device as an access point.
- Consult the Netgear website for firmware updates and technical support.
- Use a wired connection to configure the access point, reducing the risk of configuration errors.
- Ensure that the access point's wireless settings are compatible with the existing network to avoid interference and performance issues.
Such details provide a deeper understanding and appreciation for Netgear Router Access Point Setup.
For further assistance with setting up your Netgear router as an access point, contact Netgear's customer support or visit their website for additional resources and troubleshooting guides.
By following these steps and tips, you can successfully set up your Netgear router as an access point, extending the wireless coverage of your existing network and ensuring a seamless network experience for all devices.
Netgear Website
Netgear Router Access Point Setup Guide
Disclaimer: The information provided in this article is for informational purposes only and may not be applicable to all situations. Refer to the Netgear router's manual and website for specific instructions and technical support.


- 3x1G Ports, Easy Setup, Security ...")


 - YouTube")


 - YouTube")


